EverDrive Problems?
I am not affiliated with EverDrive, Krikzz or any of the official resellers
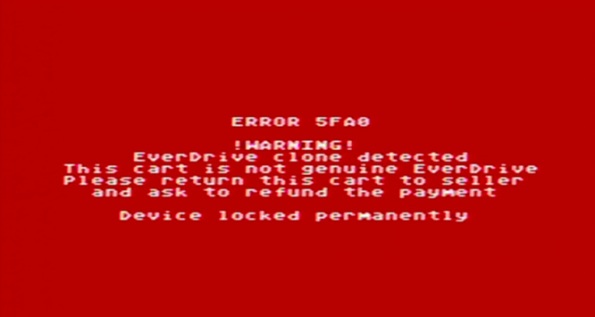
It seems many people are having problems with their EverDrive carts.
Many in the forums at krikzz.com, and some come to this blog asking for help.
But as stated by the waranty page, clones will not get support in the forums, and will not be repaired if shipped there.
Warranty
The thing is, cheap clones exist out there, and they are cheap for a reason.
Cloned Everdrive help? Look no further…
If you are planning to buy an EverDrive, make sure to buy an original unit, and not cheap defective knock-offs…
Here’s why you want to avoid eBay and AliExpress:
Loading Problems on Some Games
Some games work perfect, some games just a black screen (WARNING! N8 Clones)
What happend to my everdrive ? Did I damage it ?
Trouble with OS Update
Cloned N8 everdrive
SED2SNES fakes?
Super Everdrive China version – problem!!!
Many more are available in the forum…
All the dealers who sell real EverDrives are listed on krikzz.com
EverDrive Dealers
I like the original products, so I think the money should go to the original creator, so I will not help anyone who support these scammers with their money.
The users at the support-forum are usually very friendly and helpful, but they won’t help peoople who bought knock-off carts either.
Cloned N8 everdrive
The files located here will help you identify fake carts:
http://krikzz.com/pub/support/var/everdrive-clones/
Some even claim to sell real hardware like JackDIY and misc sellers on AliExpress and/or eBay.
To get fully working products with warranty and support, buy only from sellers on the official dealer list
Don’t try to get free support for fake carts…
PS: I am not affiliated with EverDrive, Krikzz or any of the dealer on the list
I just got tired of reading about all those people getting scammed, while the scammers get lots of money, and the one who made the products get nothing.
Windows 10 Upgrade Nag Screen
I’ve seen lots of guides on how to remove this GWX app and most of them are incomplete or overkill, so I’ve made a short tutorial myself.

GWX
There are at the time of writing a total of 6 Windows “Updates” that are directly related to the “Upgrade” to Windows 10.
All of these can safely be uninstalled, ignored, hidden and forgotten. (unless you want Windows 10)
| Name | Description |
|---|---|
| KB3035583 | Get Windows 10 app in Windows 8.1 and Windows 7 SP1 |
| KB2952664 | Compatibility update for upgrading Windows 7 |
| KB3021917 | Windows 10 Performance Checker for Windows 7 SP1 |
| KB3068708 | Diagnostic and Telemetry service update |
| KB3075249 | This update adds telemetry points to the User Account Control (UAC) feature to collect information on elevations that come from low integrity levels. |
| KB3080149 | Updates the Diagnostics and Telemetry tracking service |
1. First, you’ll have to temporarily deactivate the automatic installation of updates.
– Go to Windows Update, and click “Change Settings” in the task pane (to the left).
– Under the “Important updates”, select “Check for updates, but let me choose wether to download or install them”.
– Click OK, and enter admin credentials if prompted to do so.
2. Then, remove the updates related to the “Upgrade”.
– Go back to Windows Update, and click “Installed Updates” in the bottom of the Task Pane.
– For each update, do the following:
* Copy and paste the name of update into the search box.
* Right click the update when it shows up.
* Click uninstall.
* select Reboot Later.
3. Let Windows Update look for updates.
– Go back to Windows Update, and click “Check for updates” in the task pane.
– When Windows update tells you there are available updates, click to see which are available.
– Uncheck all updates
– Right click each of the ones you just uninstalled and select “Hide update”.
4. Reboot your computer.
5. Re-Activate automatic updates.
– Go to Windows Update, and click “Change Settings” in the task pane.
– Under the “Important updates”, select “Install updates automaticly (recommended)”.
– Click OK, and enter admin credentials if prompted to do so.
Enjoy your Windows 7 until support ends in 2020 🙂
NextGenTel Ruter Passord (Norway) – DG301, DG301b, DG301r2, DG150, X5668b
I usually wouldn’t put stuff like this on the Internet, but I have my reasons listed below.
- They rent the equipment to customers for a monthly fee.
- I don’t want to rent equipment, I want to use my own.
- Setting their current router in bridge mode is just about impossible without Admin rights.
- Getting these passwords from NGT is not an option (they won’t give them to anyone)
- Finding them by search engine is a lesson in patience
- I’ve seen lots of users asking for this in forums, and I don’t want them to go through what I did to get the passwords.
| Username: | Password: |
| user | user |
| support | support |
| admin | test |
| admin | VebBFB1963 |
| admin | BdisPLr1917 |
| admin | Wireless Key |
Now! Go configure your routers people!
If you know of a password not in this list, then please put it in a comment, and I’ll add it to the table 🙂
Love
TerminalSmurf
EDIT:
The DG301B Inteno Router without IOPSYS needs the SSID as username, and the WPS Key, or the Wireless Pin as password.
The SSID mus be entered exactly as it is, since username is case sensitive, and the password is the 8 numbered key without the dash in the middle.
I’m sorry to say that I’m not in the mood for getting one of these routers just to lure the passwords out of it.
Peace.
Using TAP files on a real Commodore 64
Wow!
I Just realized i can use TAP files on my Commodore 64 🙂
1. Install an app on my Android phone (tapDancer),
2. Purchase a cassette tape adapter with a minijack.(on EBay)
3. Put TAP files on the phone’s SD card.
4. Put adapter in Datasette Player
5. Start the c64
6. type “load” and press return.
7. press play on tape (Datasette Player)
8. Press play on tapDancer
Profit!
Just a quick tip for anyone with a c64 with a datasette player 🙂
Will post pics of this when my gf is out of the house 🙂
Amiga: Floppy Emulator
Since floppy disks are dying; Sony has stopped producing them years ago. Also because of deterioration and bit rot, floppies will probably be unusable pretty soon. This is why I’ve been thinking about floppy emulation.I’ve been researching a bit, and I’ve found two alternatives that are feasible.
1. SD HxC : This is probably the best solution, but it’s a bit expensive for me right now.
2. Gotek floppy emulator with Cortex custom firmware.
Since the gotek is alot cheaper, and the flashing procedure is pretty easy, I went with that alternative 🙂
The procedure is explained pretty well in the link, and there’s lots of photos there, so I’ll just add a few photos here that shows it installed 🙂
I couldn’t get the drive positioned right with the bracket and screws so that the lid would fit, so I glued it in place with hot glue.
I just tested it, and it boots Workbench and a few games from ADF’s on the micro sd card in the USB adapter 🙂
Amiga : Converting to full ECS
Now that the best Agnus available is installed, we just need the best Denise. Denise is pin compatible, so we won’t need an adapter.
Here’s OCS Denise (8362r8):
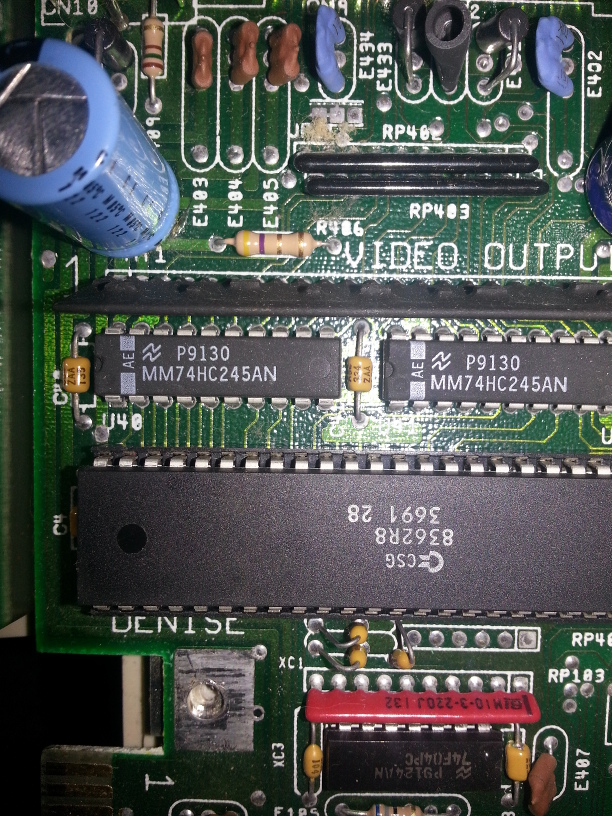
Since I don’t know how this really shuld be done, I just put the tiniest flathead screwdriver i have under the chip, and carefully forced it up. Extreme care should be taken as not to bend the chip’s pins!
And here’s HiRes Denise (8373r4) in her place:
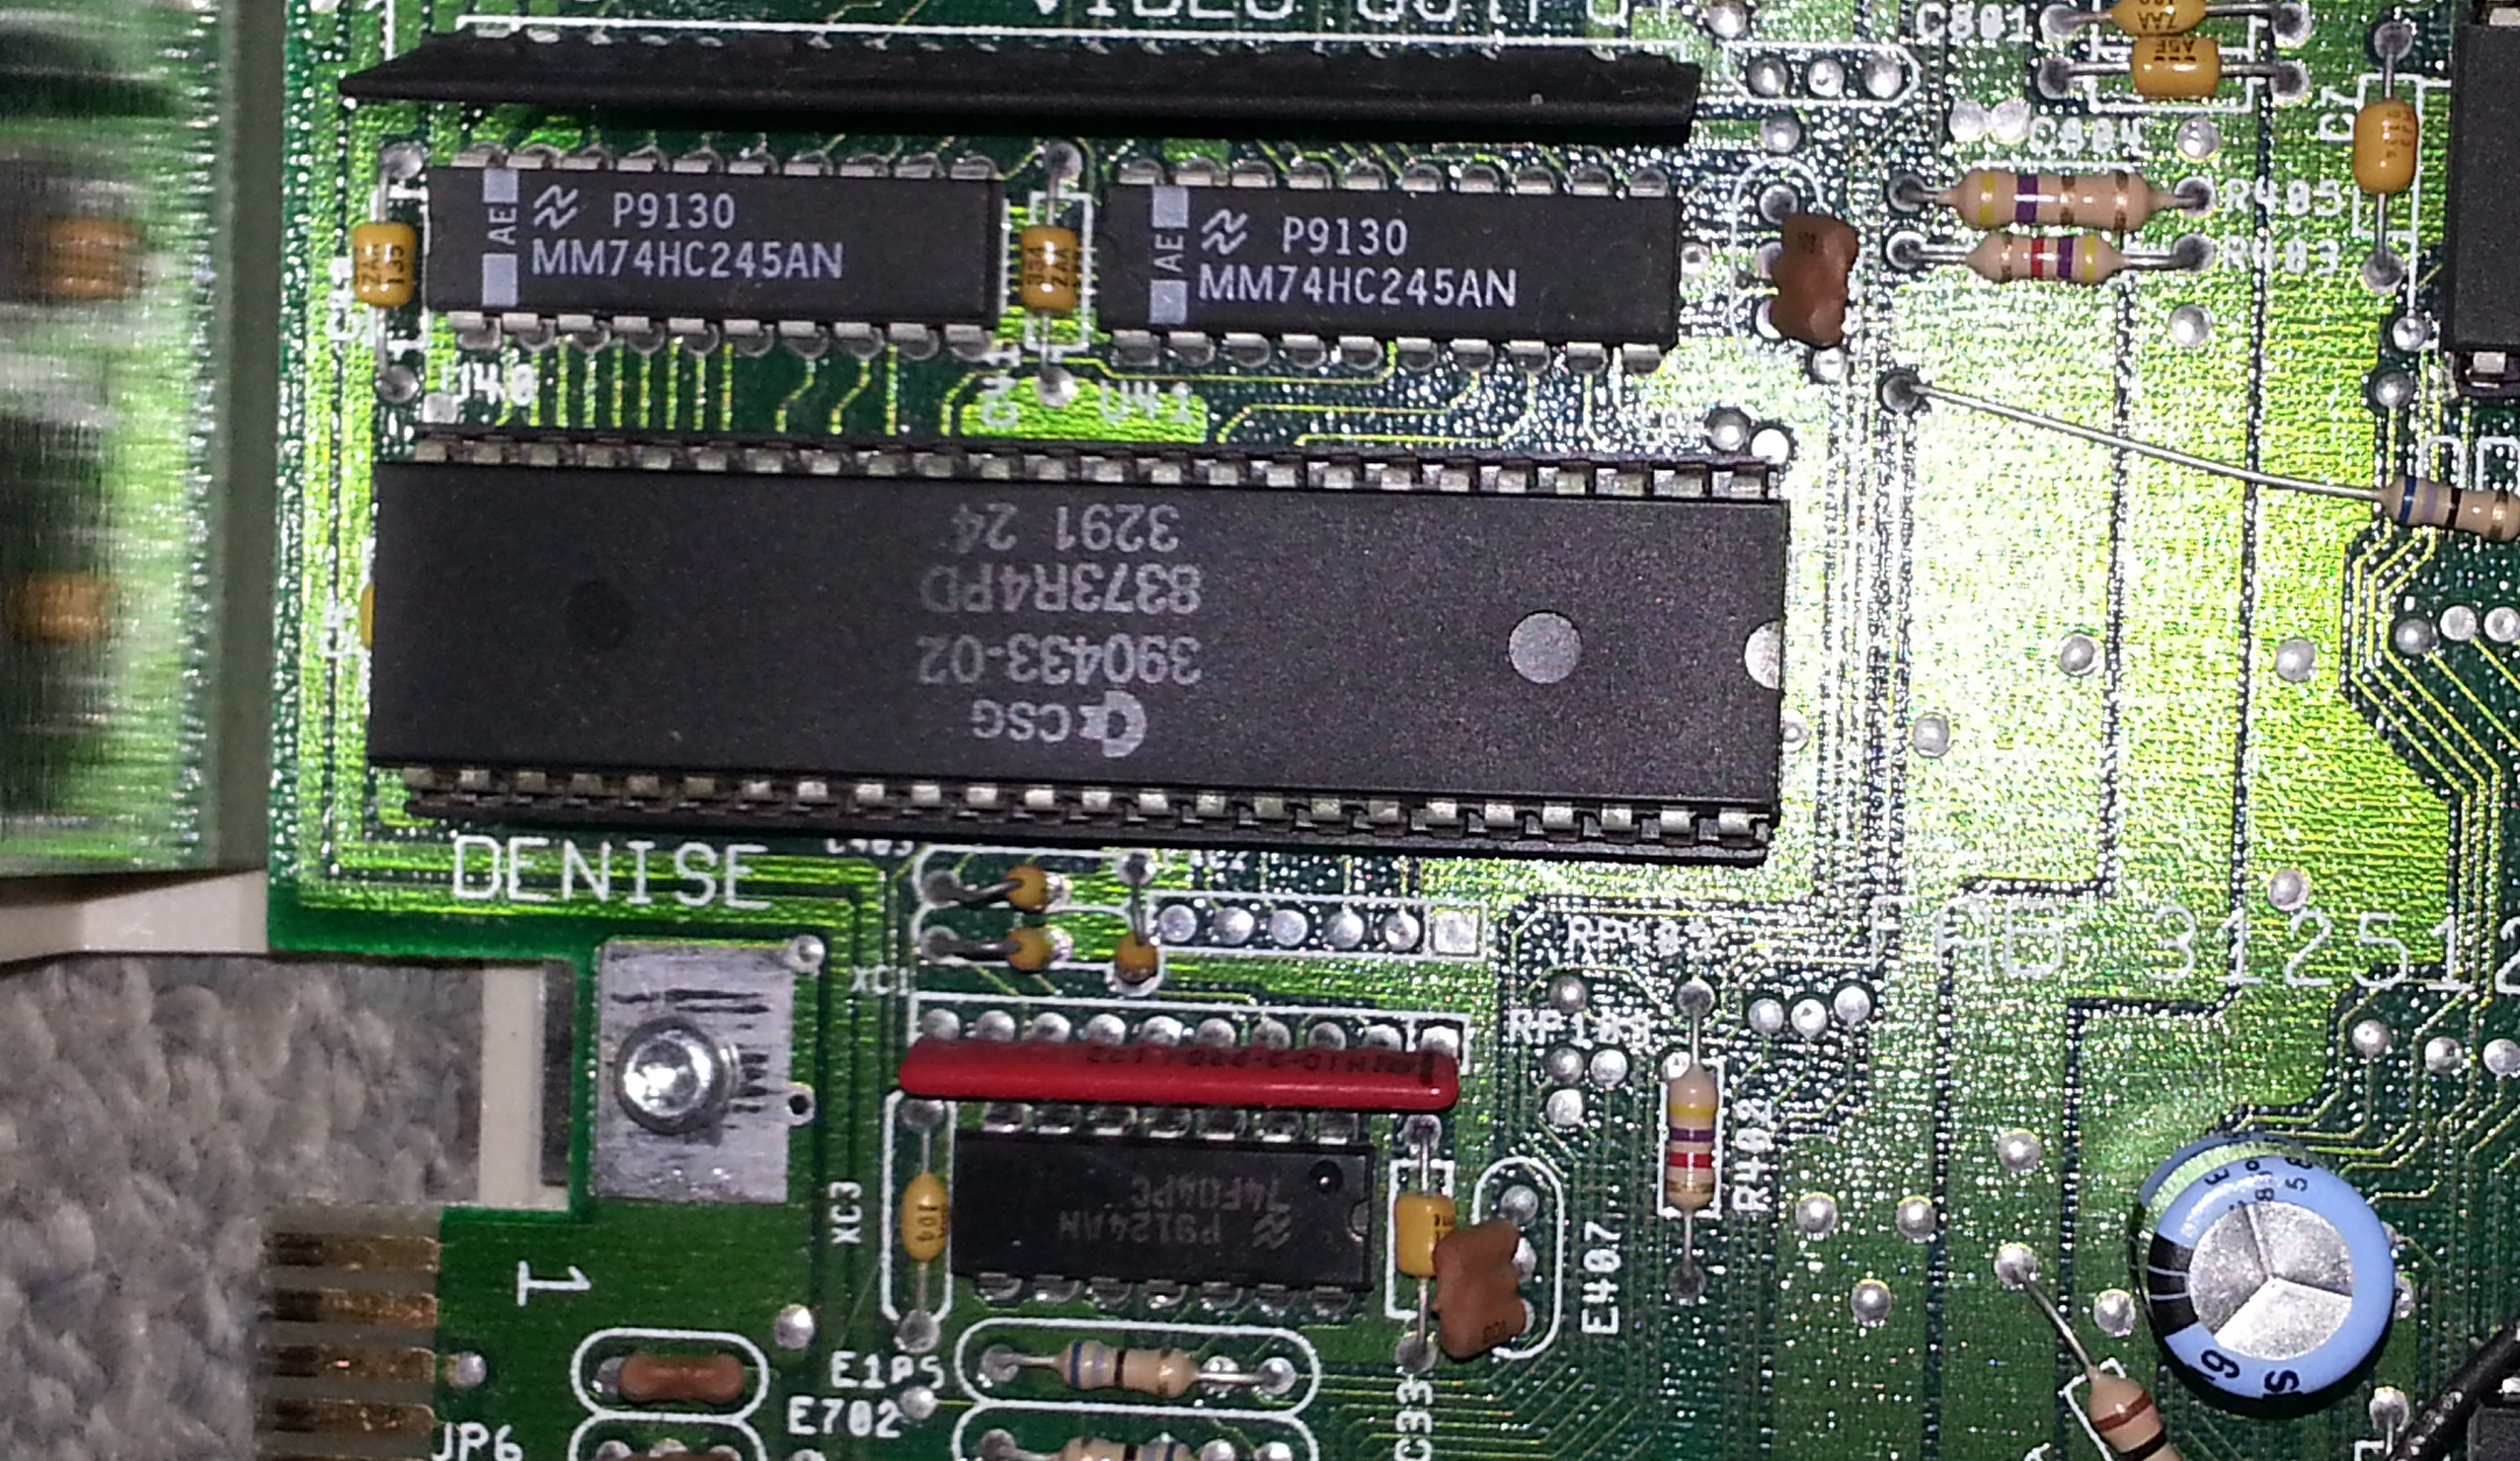
And here you can see that she’s located at the upper left portion of the motherboard:
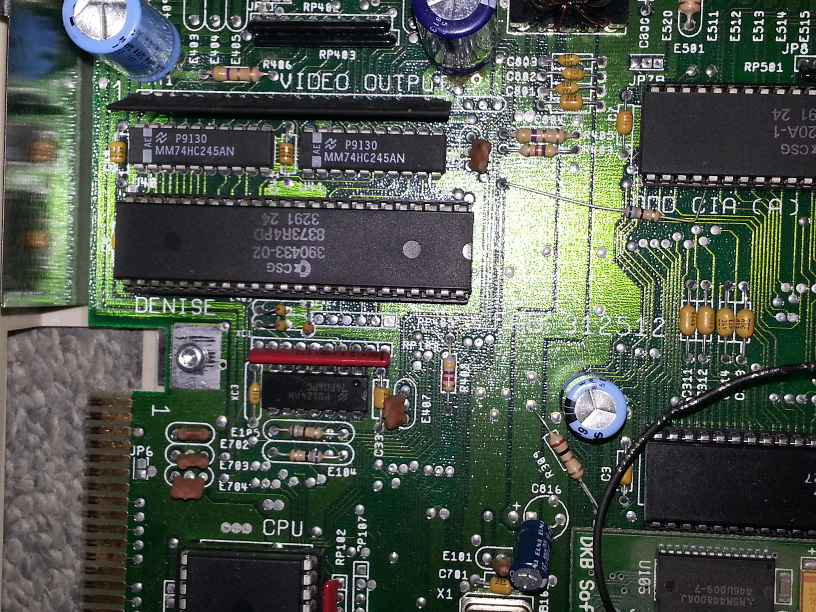
You can even see the edge of the Agnus adapter card in the bottom right corner 🙂
If this A500 had a Kickstart 1.4, and a new clock battery on the RAM expansion board, she would now be a fully functional A500+ 🙂
Amiga : ChipRAM expansion
A while ago I recieved some chips for my A500, They’ve just been lying around waiting for me to get some free time.
For now I’ll do the Motherboard SlowRAM to ChipRAM mod, and Install the DKB MegAChip. Since the tutorial i link to contains pictures of the mod, I’ll just add pictures of the Agnus swap & MegAChip adapter.
Here’s the Socket on the Motherboard with the original (1MB) 8372A:

Here I didn’t want to risk destroying the chip or socket, so I got a PLCC extractor to remove the chip.
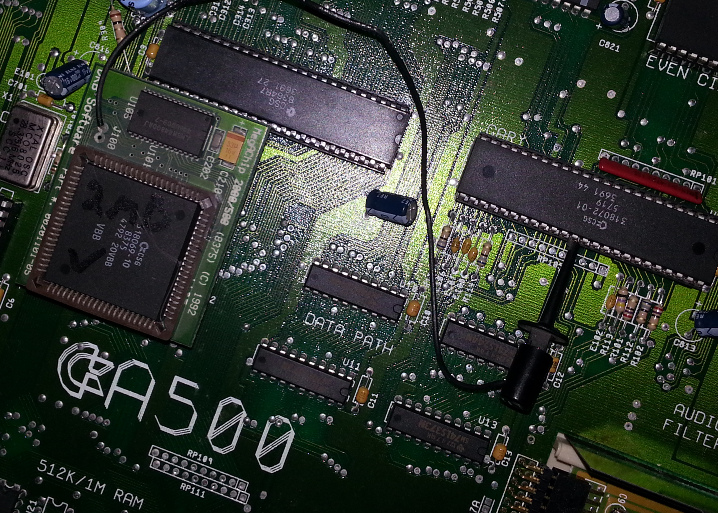
Here’s a pic of the adapter installed in the Agnus slot, and the Super Agnus (8375) installed in the adapter.
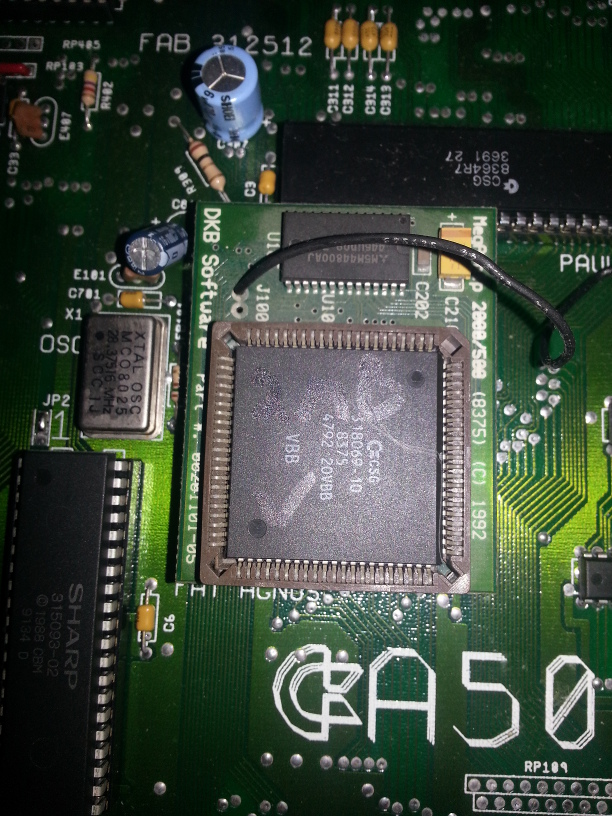
Then I added the lead to pin 36 on Gary.
This is what that looks like:
So now I’m at 2MB ChipRAM.
512k @ MB
512k @ Trapdoor
1024k @ DKB MegAChip
Modding my Amiga 500: The surprise
When i inspected the A500, I saw something that’s not good 😦
The battery for the Amiga’s clock had started leaking. The stuff that leaks from these batteries is very corrosive
, so this is really not good!
The first I did was check to see if the motherboard had started corroding. At that point I got lucky. The only thing affected was the RAM expansion.
I forgot to take pictures before removing battery and cleaning, but here you can see the expansion with battery removed:
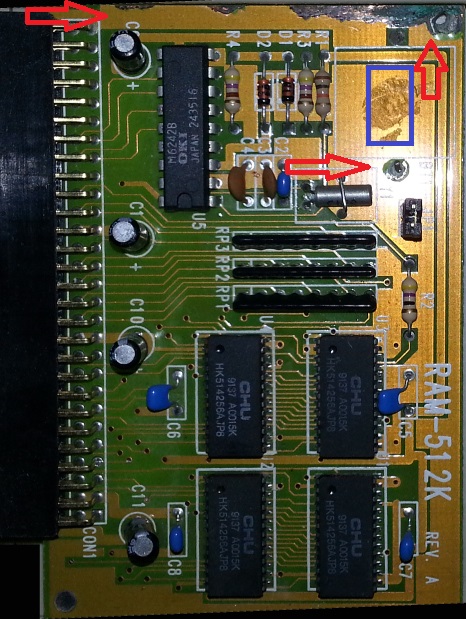
The red arrows point to the corrosion.
The blue rectangle is approximately where the battery was.
Here is a zoomed view:

I used a pair of small pliers and snipped the leads to the battery, and then ripped it off the board.
I cleaned the residue, and the corrosion with rubbing alcohol and a toothbrush.
Then i rinsed it well with clean water and set it to dry.
RAM expansion is dried and tested. A500 boots without a hitch, and RAM is detected in Workbench 🙂
Yay!
Modding my Amiga 500: The Plan
The plan so far:
* Get 2MB Chip RAM
* Get full ECS (Enhanced Chip Set)
* Floppy Emulation
* Get the Zeus68k (Accelerator, IDE controller, Kickstart switcher, Fast RAM expansion, Freezer e.t.c) (http://eab.abime.net/showthread.php?t=65047) or feasible alternative.
SD2SNES Setup Tutorial
When I got this great flashcart I found no guide or tutorial to set it up, so I’ll write the steps here in a easy to follow numbered list 😉
First i tried the latest firmware (0.1.5), and found that my SNES would hang in the SD2SNES menu all the time, but if I started a game it all worked perfect. Then I tried 0.1.4a, that worked great 🙂
First, I'll advise that you format your SD card to get rid of any file system errors.Just use the normal Windows formatter and format it as FAT32 with default cluster sizes.
Getting firmware from the official sd2snes blog, here's a direct link to the downloads section.
Download the latest firmware (except 0.1.5) and extract the zip to the sd card. There should now be an sd2snes folder in the root of the sd card containing:
bsxpage.bin

cx4.bin

firmware.img

fpga_base.bit

fpga_cx4.bit

menu.bin

sd2snes.db

sd2snes.dir
Now you need to get some extra files and add them to the sd2snes folder:
dsp1.bin

dsp1b.bin

dsp2.bin

dsp3.bin

dsp4.bin

st0010.bin
I found these at Stone Age Gamer. Go to the SD2SNES page, click downloads, and download the files. Extract them to the SD2SNES folder on the SD card.
Now create a new folder on SD root, and put your roms in it. Do not put roms in the SD2SNES folder, since that's a system folder, and it won't show up in the menu.
Safely remove SD card, then put it in your SD2SNES. Put the SD2SNES in your SNES, then power it up.
Enjoy playing 🙂
Edit:
There’s a setup guide for the SD2SNES at the downloads page on the official SD2SNES blog. I just didn’t remember at the time of writing.
